
Hello, yesterday I was trying to install android emulators on my PC. After trying a few popular emulators, I decided to try VirtualBox software. While trying installing to install a few different Android-x86 roms and I’ve actually faced with some problems and then solved them successfully. So in this article I would like to share my experience installing and creating virtual machine with CyanogenMod 13.0 Android-x86 6.0.1 on VirtualBox. Installing Android on VirtualBox is a great way to test and experiment with a fully working Android system. It gives you much more possibilities than just playing some simple android games on emulators.
In this detailed guide I’m going to show you how to install Android 6.0.1 CyanogenMod 13 on VirtualBox. You’ll need to download CM 13 Android-x86 image file and have VirtualBox installed. I was using latest version of VirtualBox 5.1.12 r112440 (Qt5.6.2).
Also I have to enable Virtualization Technology (VTx) and Virtualization Technology Directed I/O (VTd) to install and run CM13 Android on my PC. You can also find most common issues and fixes related to installing Android-x86 on VirtualBox in the bottom of this post.
Installing Android-x86 on VirtualBox Emulator
Creating Virtual Machine for Android-x86
- First you need to download CyanogenMod 13 Android x86 image.
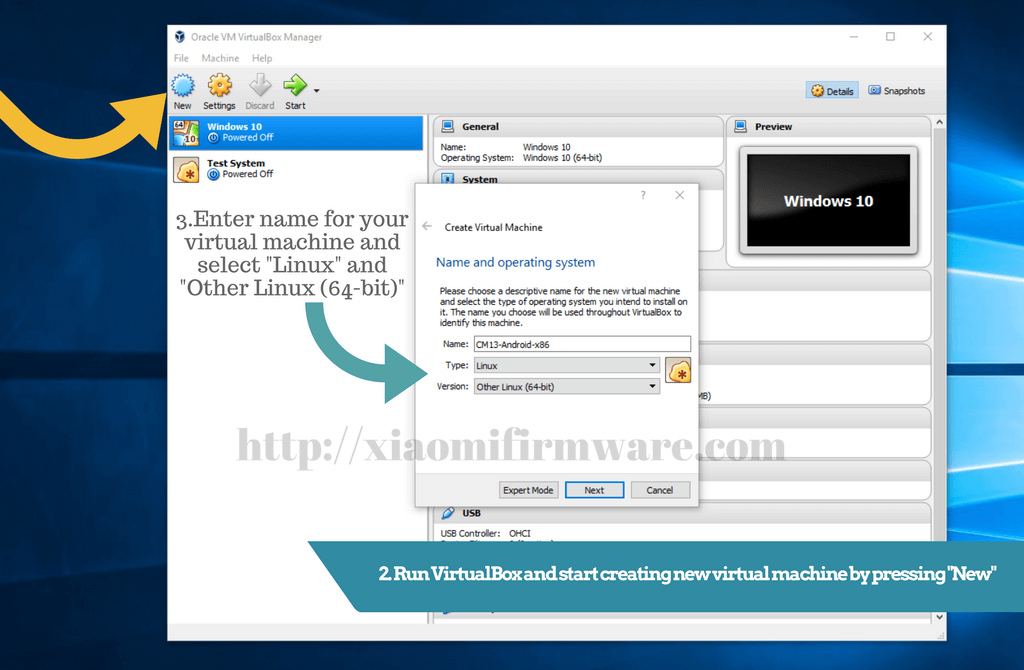
- Run VirtualBox and start creating new virtual machine by pressing “New”.
- Now enter name for your virtual machine and select “Linux” and “Other Linux (64-bit)” and press “Next”.
Create new virtual machine and select “Linux” and “Other Linux (64-bit)” - Now select amount of RAM to be allocated to your Android x86 virtual machine. In my case of installing this exact CM 13 image I have to select 4096 MB of RAM. Update: It’s possible to select smaller amounts of RAM. It’s working good with 512 MB or 1024 MB memory size.

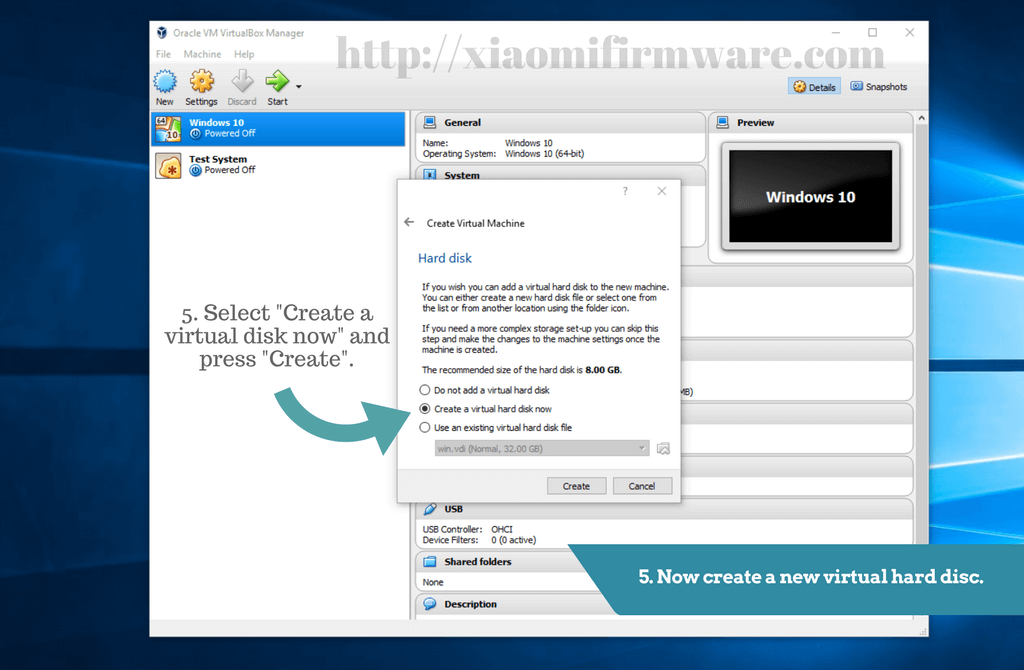
Select 4096 MB of RAM for CM 13 Android x86 virtual machine - Now create a new virtual hard disc. Select “Create a virtual disk now” and press “Create”.
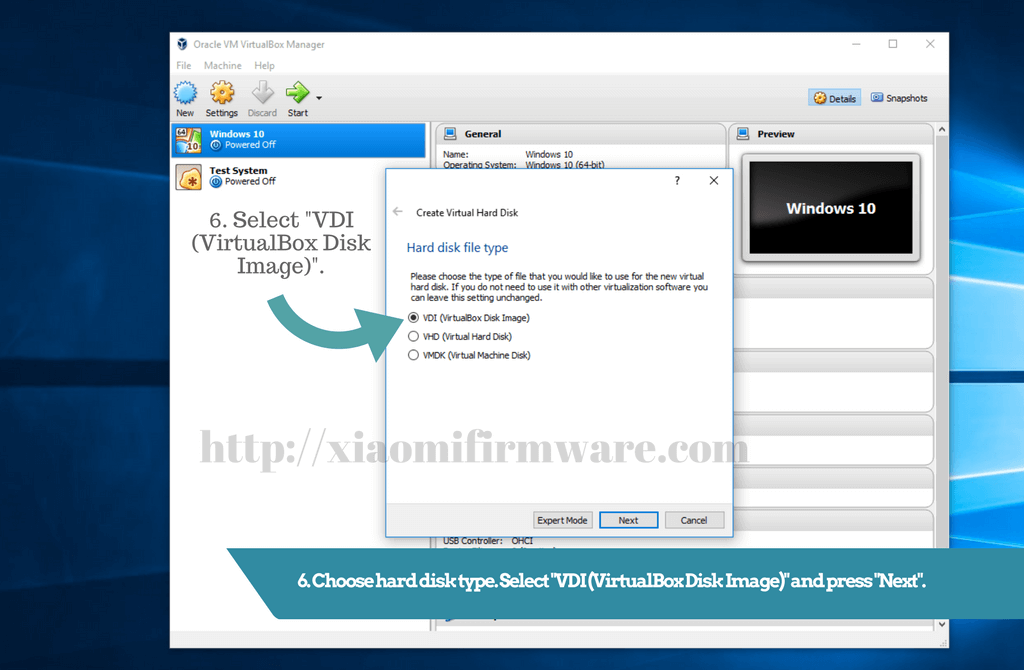
Create a new virtual hard disc by selecting “Create a virtual hard disk now”. - Now we need to choose hard disk type. Select “VDI (VirtualBox Disk Image)” and press “Next”.
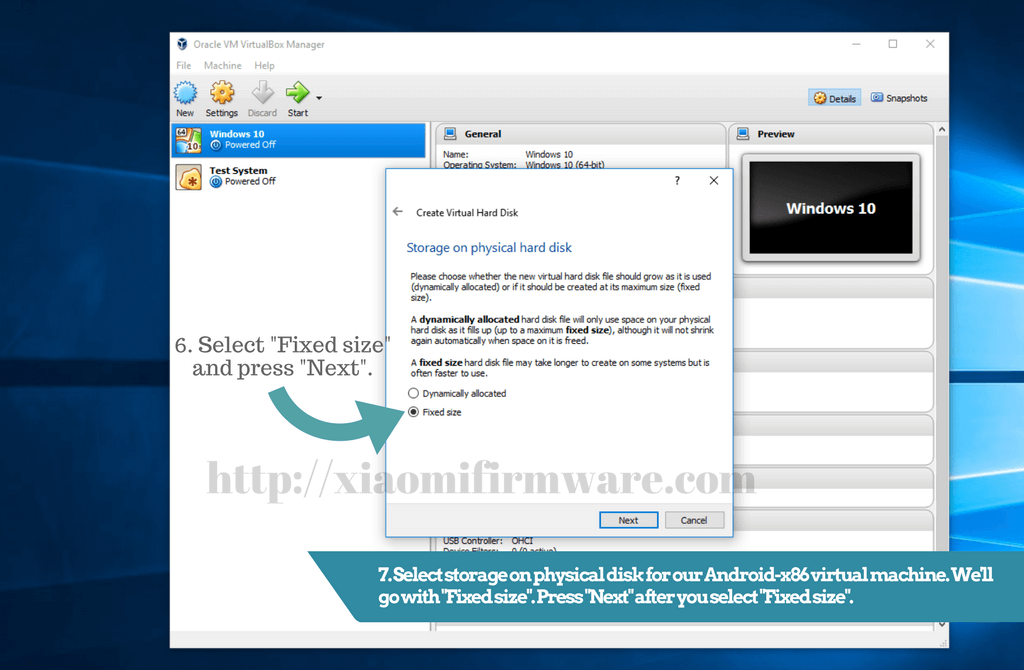
Select “VDI (VirtualBox Disk Image)” and press “Next”. - Select storage on physical disk for our Android-x86 virtual machine. We’ll go with “Fixed size”. Select “Fixed size” and press “Next”.
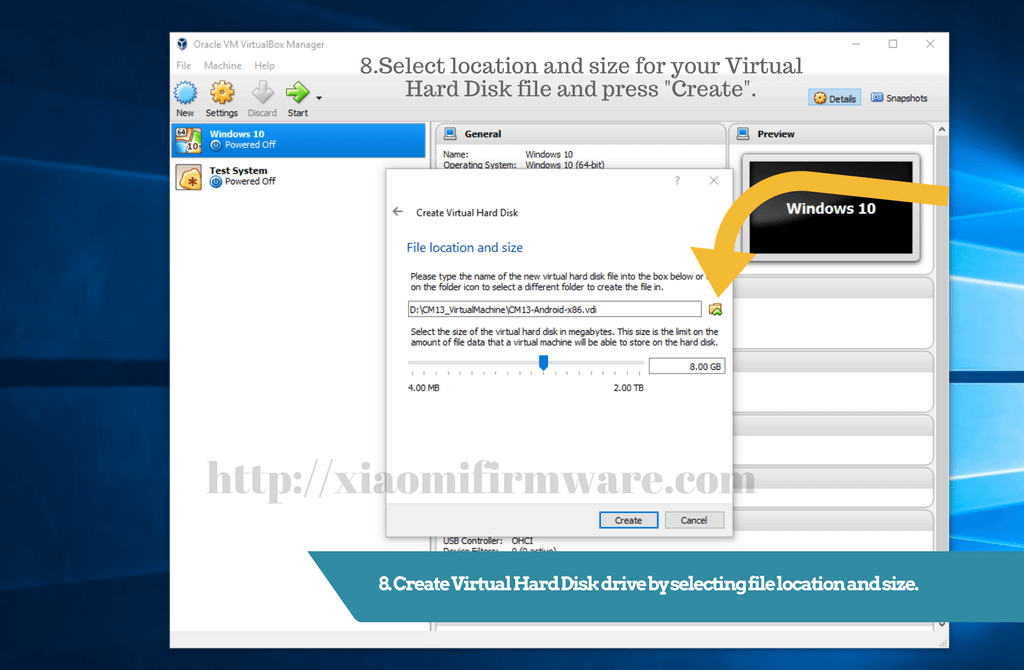
Slect “Fixed size” and press “Next”. - Create Virtual Hard Disk drive by selecting file location and size. Recommended size in 8.00 GB, you can make it bigger if you need to. Select location for your Virtual Hard Disk file and press “Create”.
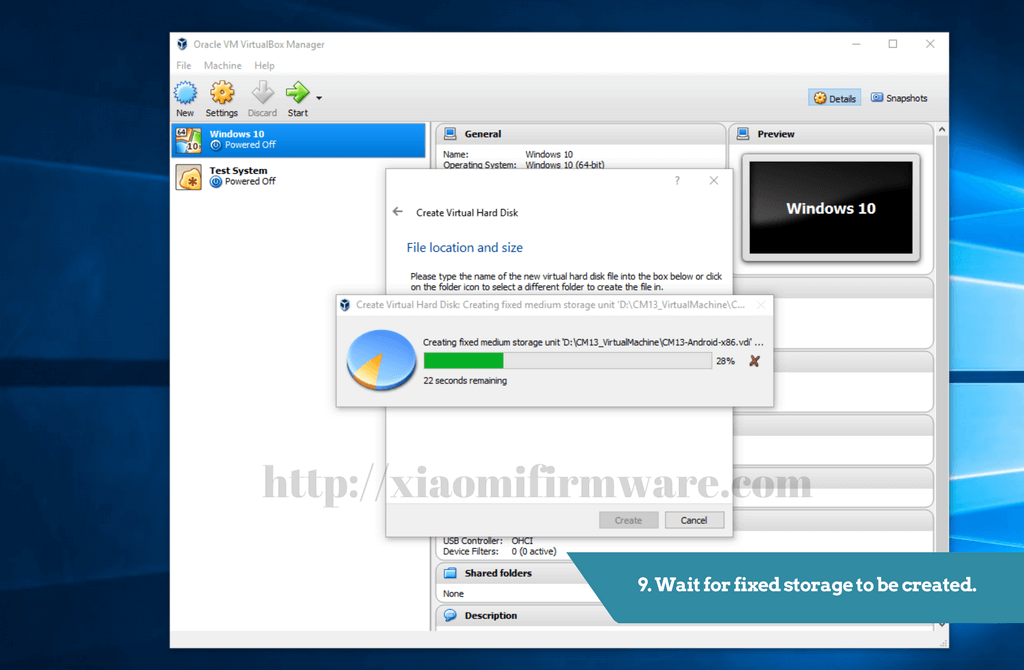
Select location and size for your Virtual Hard Disk file and press “Create”. - The process should start. Wait for fixed storage to be created.
Wait for fixed storage to be created. - Congratulations! You’ve created a VirtualBox virtual machine to run Android x86 CyanogenMod 13 on your PC!
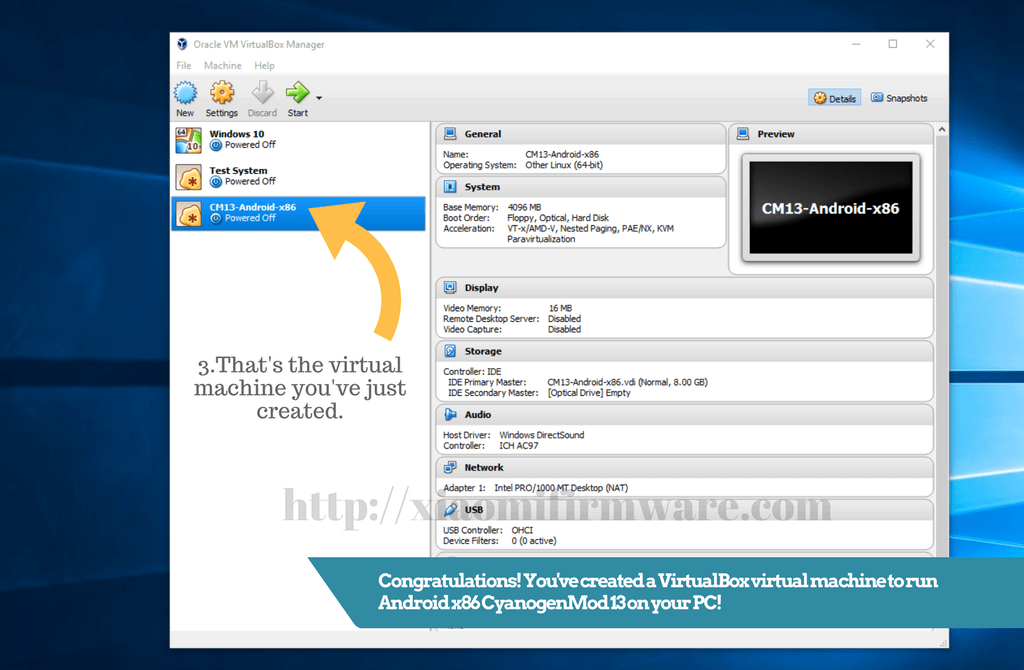
Congratulations! You’ve created a VirtualBox virtual machine to run
Android x86 CM13 on your PC!
Now we will continue to the second part of this guide and before starting our virtual machine we will need to install CM 13 on VirtualBox.
Installing Android-X86 CyanogenMod 13 on VirtualBox Virtual Machine
- First we need to point VirtualBox virtual machine to downloaded Android-x86 CM 13 ISO file.
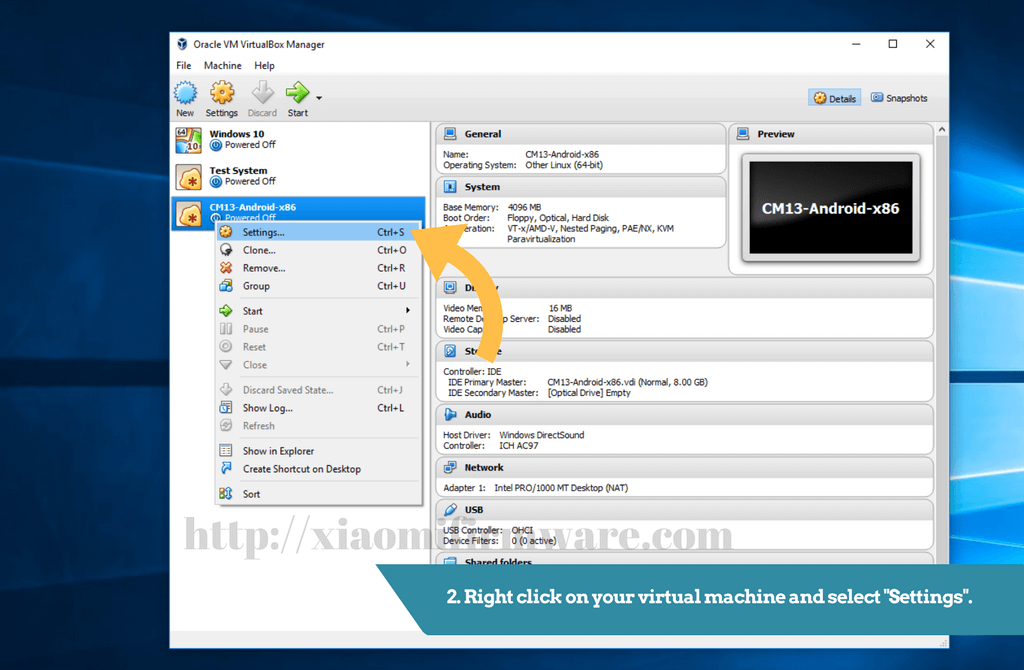
- Right click on your virtual machine and select “Settings”.
Right click and press “Settings”. - Now in the “Setting” select “Storage” in the left column. Click on the empty drive, then click on the disk icon in the right corner and click on “Choose Virtual Optical Disk File”.

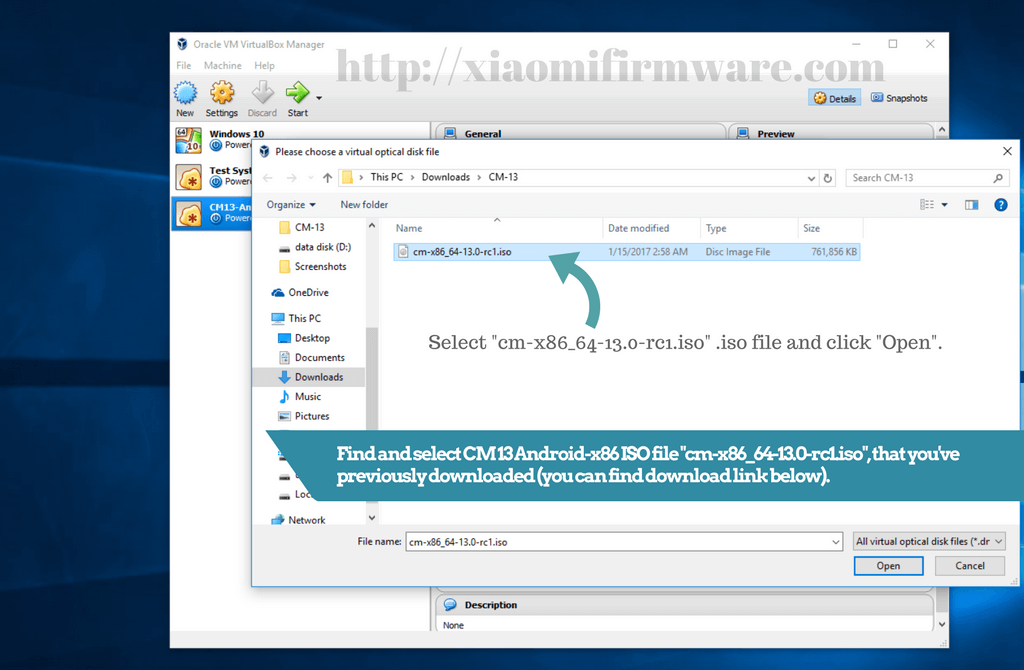
1. Select “Storage”. 2. Select “Empty” drive. 3. Click on “Choose Virtual Optical Disk File”. - Find and select CM 13 Android-x86 ISO file “cm-x86_64-13.0-rc1.iso”, that you’ve previously downloaded (you can find download link below). Select “cm-x86_64-13.0-rc1.iso” .iso file and click “Open”.
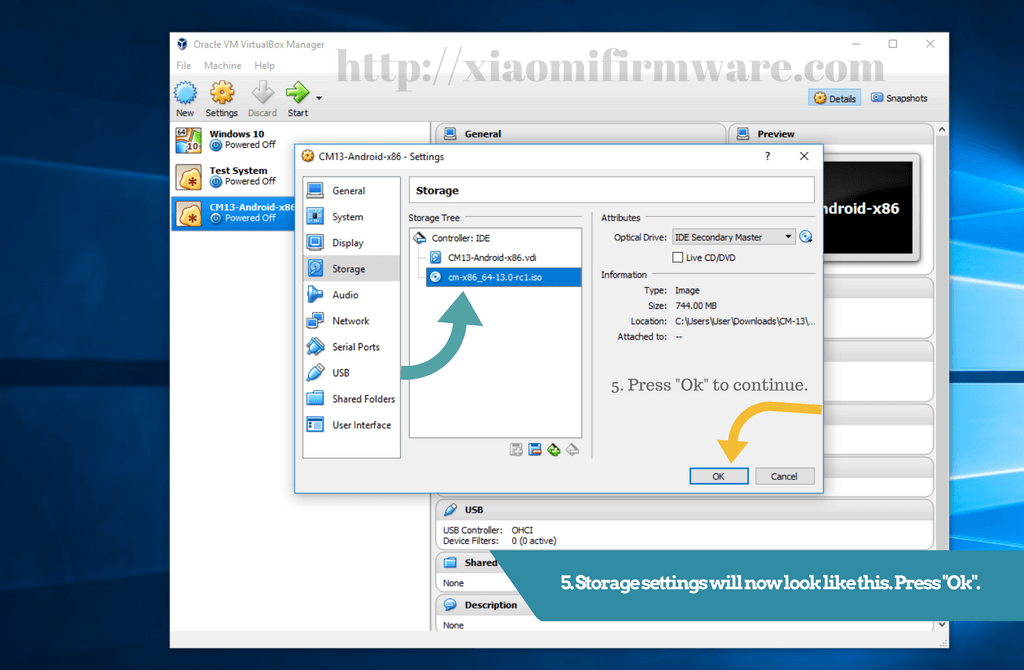
Select “cm-x86_64-13.0-rc1.iso” .iso file and click “Open”. - Storage settings will now look like this. Press “Ok”.
After you’ve selected .iso image and press “Ok”. - Now press “Start” to boot your virtual machine.
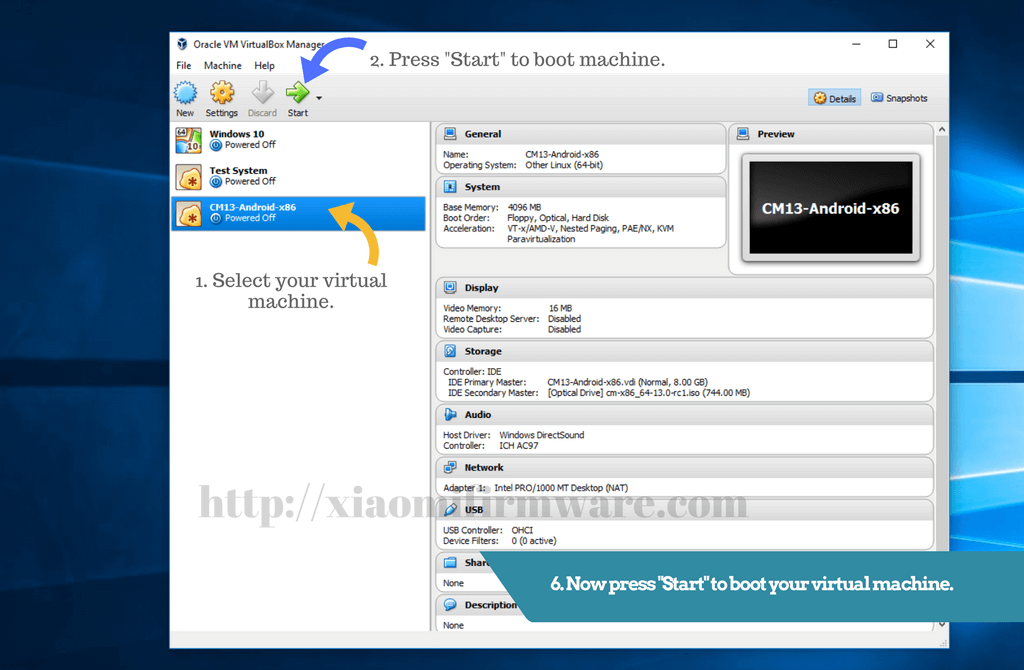
Now press “Start” to boot your virtual machine. - The Android-x86 installer will boot up.
- Use keyboard arrow keys to navigate and select “Installation – Install Android-x86 to harddisk”.
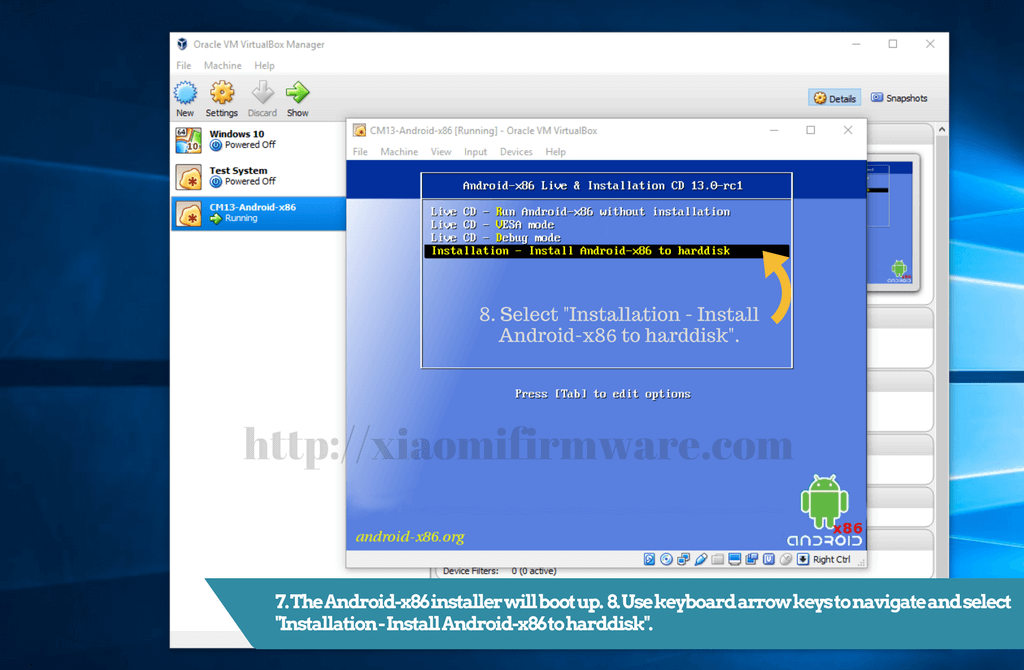
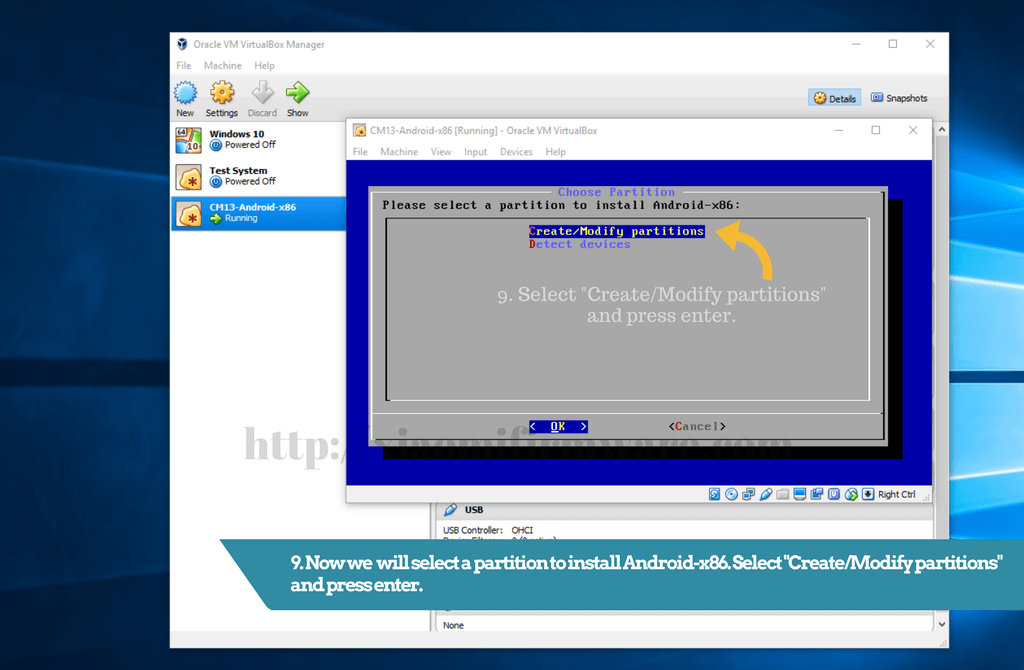
The Android-x86 installer will boot up. Select “Installation – Install Android-x86 to harddisk”. - Now we need to select a partition to install Android-x86. Select “Create/Modify partitions” and press enter.
Select “Create/Modify partitions” and press enter. - On the next window “Do you want to use GPT?” – Select “No”.

“Do you want to use GPT?” – Select “No”. - Now using “left” & “right” arrow keys select “New” to create new partition from free space and press “Enter”.

Select “New” to create new partition from free space and press “Enter”. - Select “Primary” and press “Enter” to create a new primary partition for Android-x86 installation.
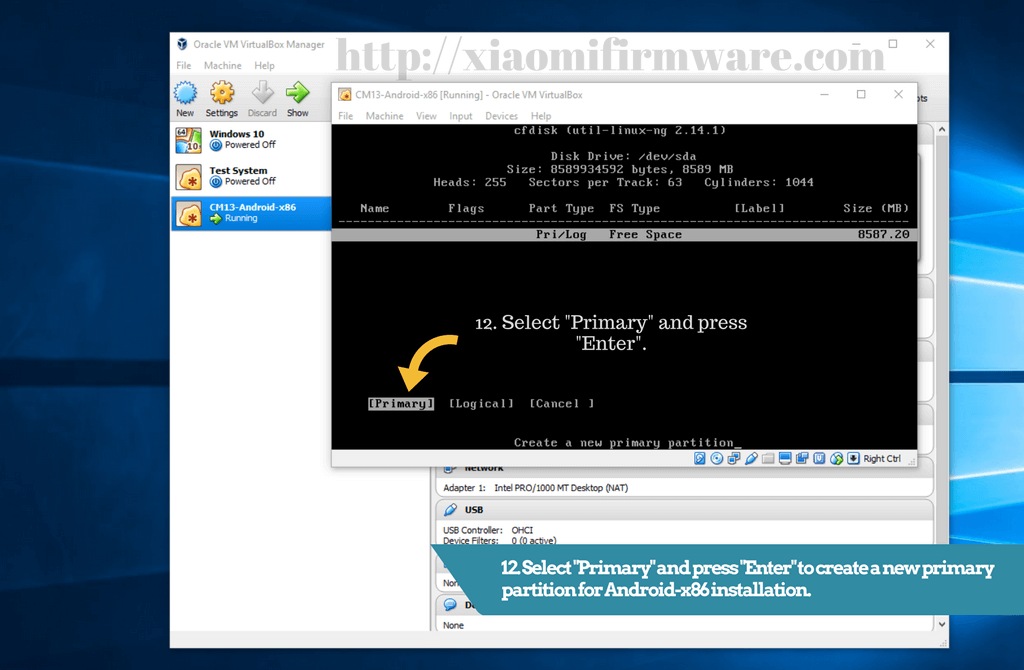
Select “Primary” and press “Enter” to create a new primary partition for Android-x86 installation. - Press “Enter” again to select entire size of the virtual disk we’ve previously created.

Press “Enter” again to select entire size of the virtual disk. - Select “Bootable” option and press “Enter” to toggle bootable flag make the selected partition bootable.
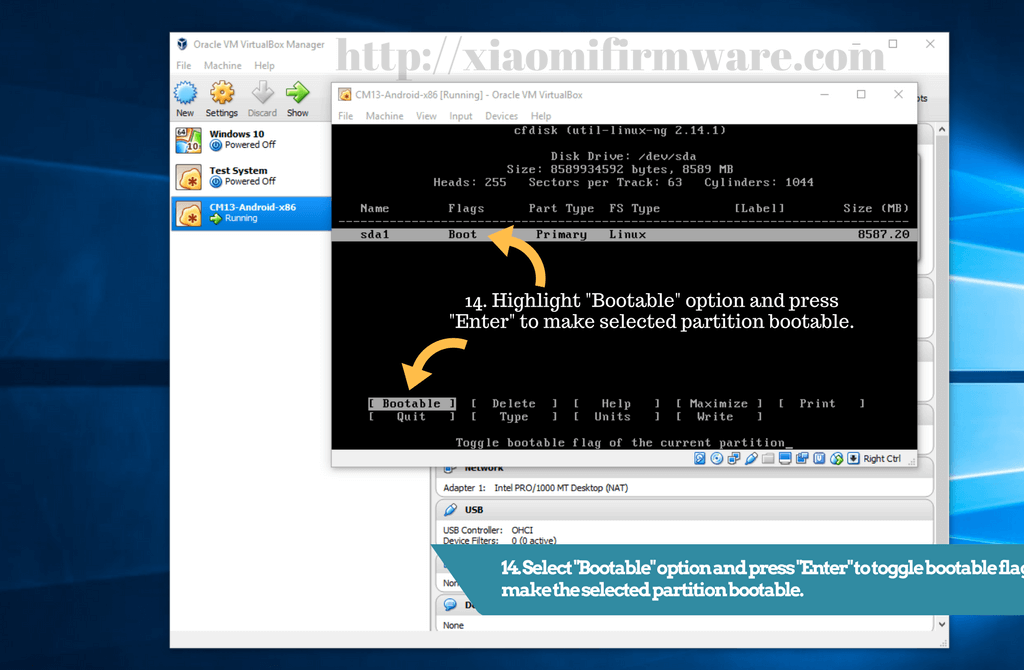
Highlight “Bootable” option and press “Enter” - Highlight “Write” option and press “Enter” to write partition table to disk.
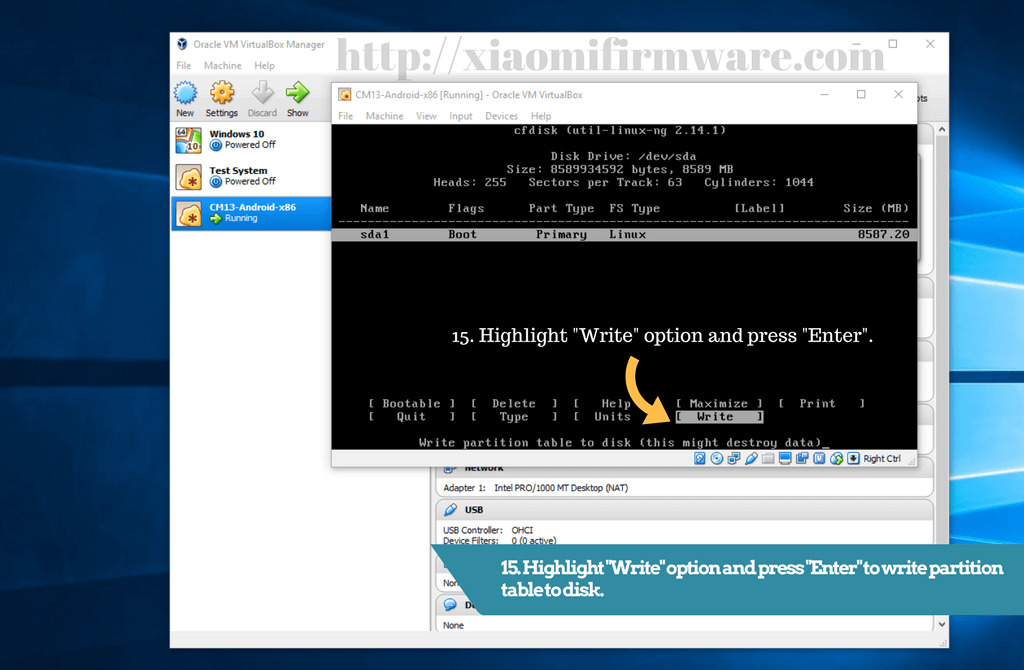
Highlight “Write” option and press “Enter”. - On the next screen type “yes” and press “Enter” to write the partition table to disk.
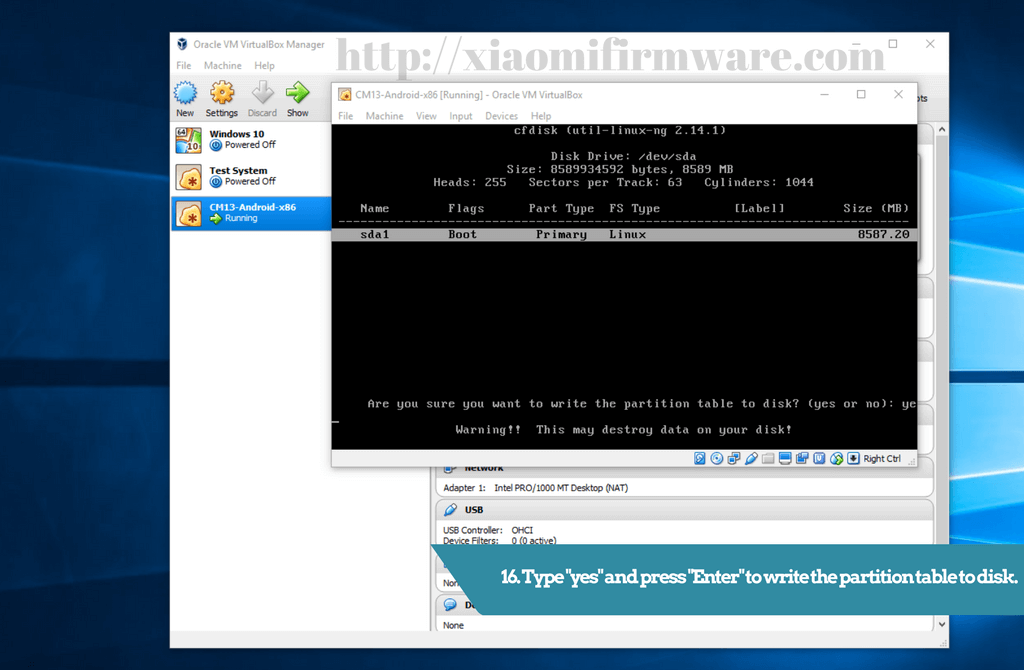
Type “yes” and press “Enter” - Wait a little bit while partition table is being created.
- Navigate to “Quit” and press “Enter”.
- Now we’re back to “Choose Partition” screen. You’ll see the partition you’ve just created. Select this partition to install Android-X86, then highlight “Ok” and press “Enter”.
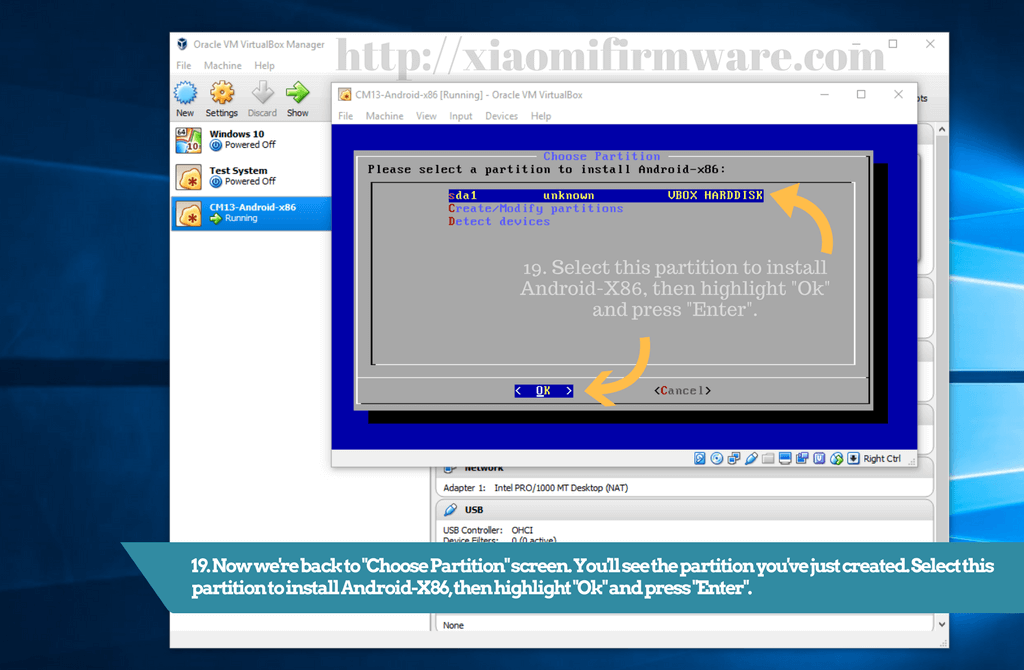
Select partition to install Android-X86, then highlight “Ok” and press “Enter” - On the next screen select a file system to format Android-x86 partition. We will need to format partition to “ext4”.
- Select “ext4” filesystem.
- On the next screen Select “Ok” and press “Enter” to confirm format to “ext4”.

Select “Yes” and press “Enter” to confirm format to “ext4”. - After partition format, confirm with GRUB boot loader installation select “Yes” and press “Enter”.
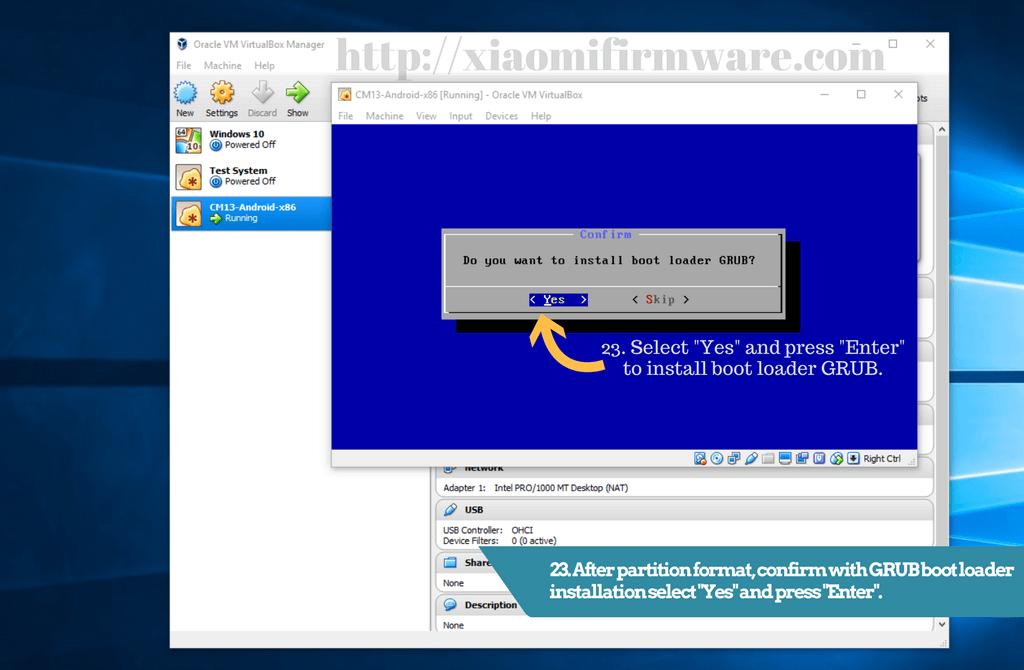
Select “Yes” and press “Enter” to install boot loader GRUB. - Another question will appear. Select “Yes” to install system directory as read-write.
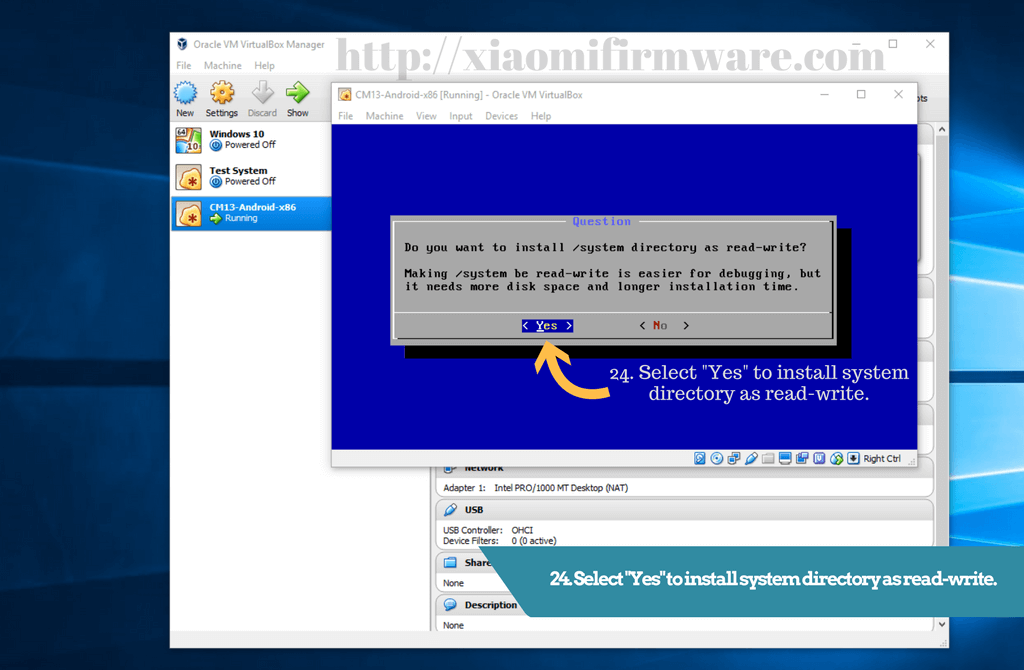
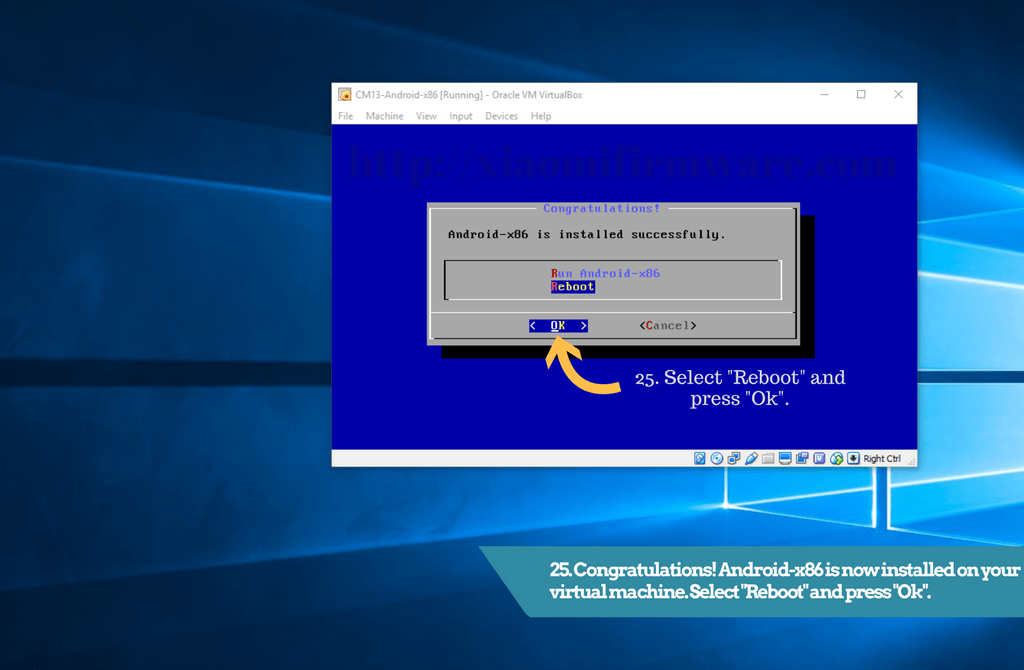
Select “Yes” to install system directory as read-write. - Android-x86 should be installed successfully. Select “Reboot” and press “Ok”.
Select “Reboot” and press “Ok” - Now you need to remove Android-x86 disk image from virtual drive, so you can start CM13 and not be booted in live installation CD again. Press “Devices” > “Optical Drivers” > “Remove disk from virtual drive”.
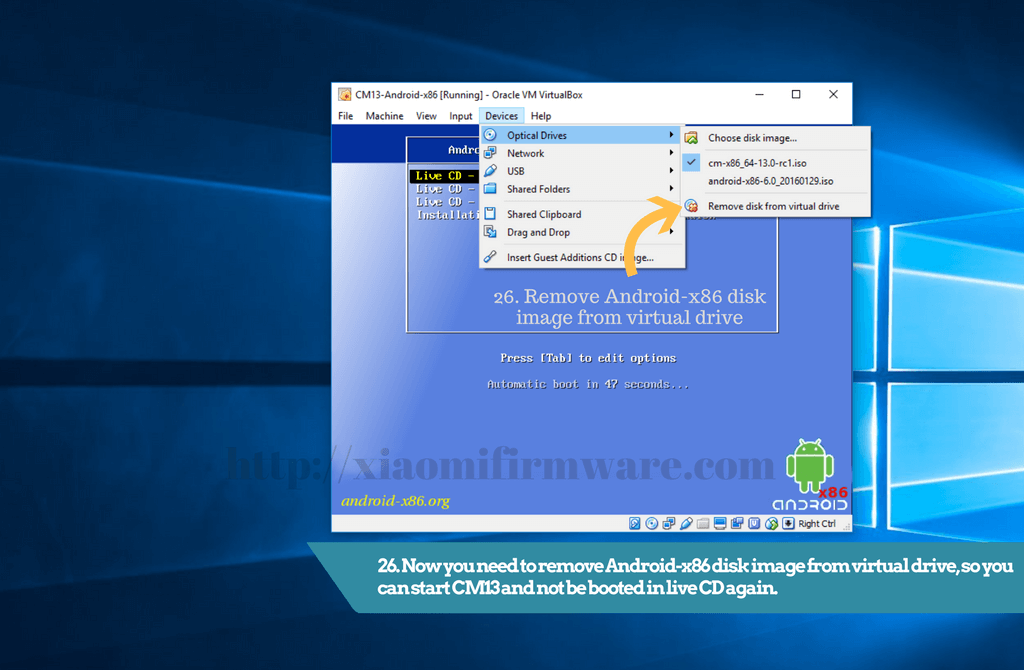
Press “Devices” > “Optical Drivers” > “Remove disk from virtual drive”. - Now reboot your virtual machine again. Press “Host + R” or “Machine” > “Reset”.
- After rebooting you’ll see “Trusted GRUB 1.1.5” boot loader.
- Select “Android-x86 13.0-rc1” and press “Enter” to boot CM13 Android 6.0.1.
- You should see standard Android first startup setup screen. Change and select your language and time preferences.
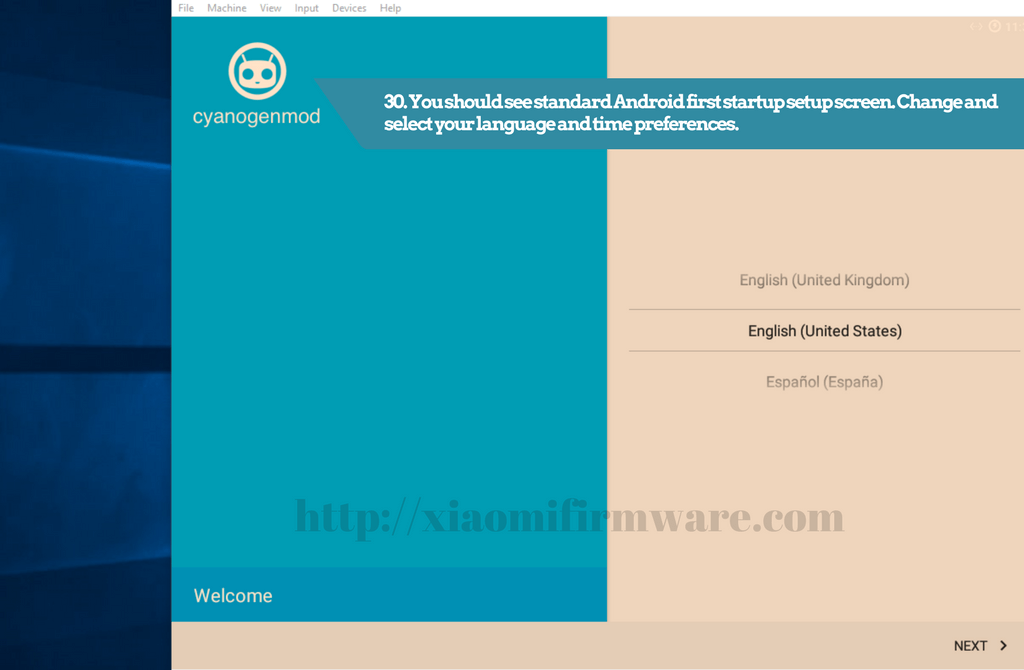
Change and select your language and time preferences.
Skip WiFi connection setup. - Skip WiFi connection setup. You’ll be able to use network, browse website and download apps anyways, using your main network.
- That’s it! Congratulations! You’ve installed Android-x86 CyanogenMod 13 on your PC!
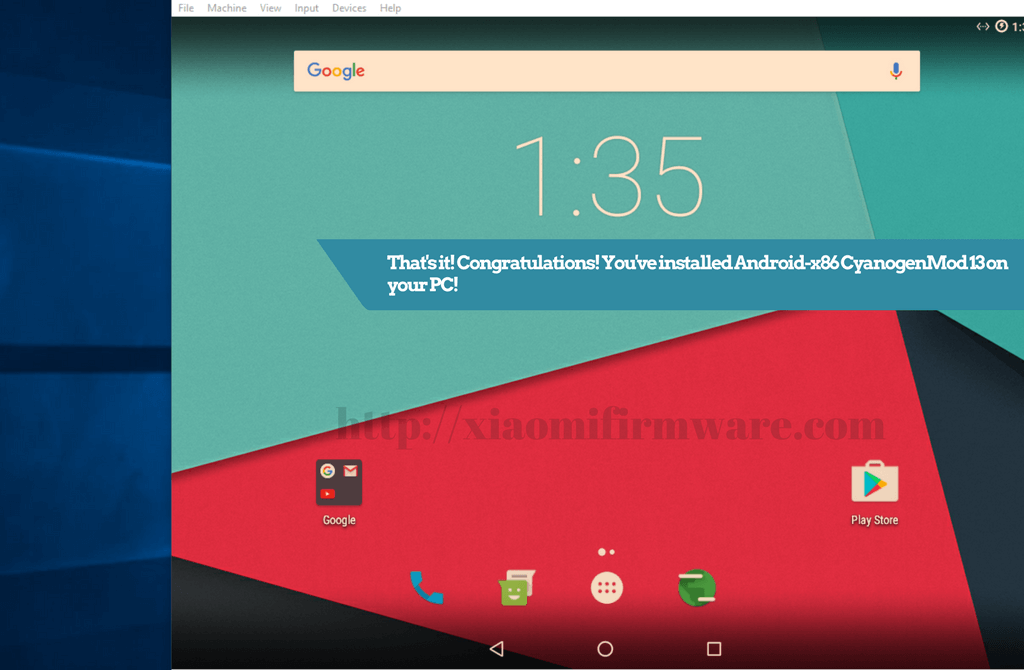
Congratulations! Android-x86 CyanogenMod 13 is now installed on your PC!
Solutions & Bug Fixes
“This kernel requires an x86-64 CPU” – Android-x86 on VirtualBox
Error: This kernel requires an x86-64 CPU, but only detected an i686 CPU. Unable to boot – please use a kernel appropriate for your CPU.
Solution: In case of this message, make sure you’ve selected Other Linux (64-bit) version and have dedicated enough RAM memory for virtual machine. You can also try different RAM settings and make dedicated RAM amount bigger or smaller. (Settings > System > Motherboard).
Enable VT-x / AMD-V hardware acceleration – Android-x86 on VirtualBox
Error: “VT-x/AMD-V hardware acceleration is not available on your system” or “Failed to open a session for the virtual machine”
Solution: You need to enable VT-d and VT-x technology in BIOS.
- Restart your PC and boot in BIOS. Depend on your system press “F2”, “DEL” or “F12” to enter BIOS menu.
- In “Security” or “Advanced” tab find and enable “VT-d technology” (location depends on PC).
In my case it was called “Intel Virtualization Technology” and it was located in “Advanced” tab in BIOS.
Mouse Integration – Android-x86 on VirtualBox
In case you’ve got some troubles or mouse issues on VirtualBox Android-x86 machine try resetting “Input” > “Mouse integration”. Try to enable/disable it. To switch over virtual machine mouse and windows mouse, just press right”CTRL”.
Landscape/Portrait issues – Android-x86
First solution is to disable screen rotation in Android settings. Here’s a simple steps:
- “Settings” > “Display & lights” > Disable “Auto-rotate screen”.
You can also try these hot-keys in VirtualBox to rotate Android-x86 screen on virtual machine.
- Double-tap “F9”
- Double-tap “F10”
- Double-tap “F11”
- Double-tap “F12”
How to get root on Android-x86 CM 13 Emulator
To get root on Android-x86 CyanogenMod 13 first you need to enable “Developer options”.
- Start virtual machine, go to “Settings” > “About tablet”.
- Then click seven times on “Build number” to enable “Developer options”.

click seven times on “Build number” to enable “Developer options”.
Now, after you have enabled developer options, you can enable root on Android-x86 CM 13 virtual machine.
- Get back into “Settings” and now select “Developer options”.
- Click on “Root access” and select “Apps and ADB”. Allow root access by pressing “Ok”.
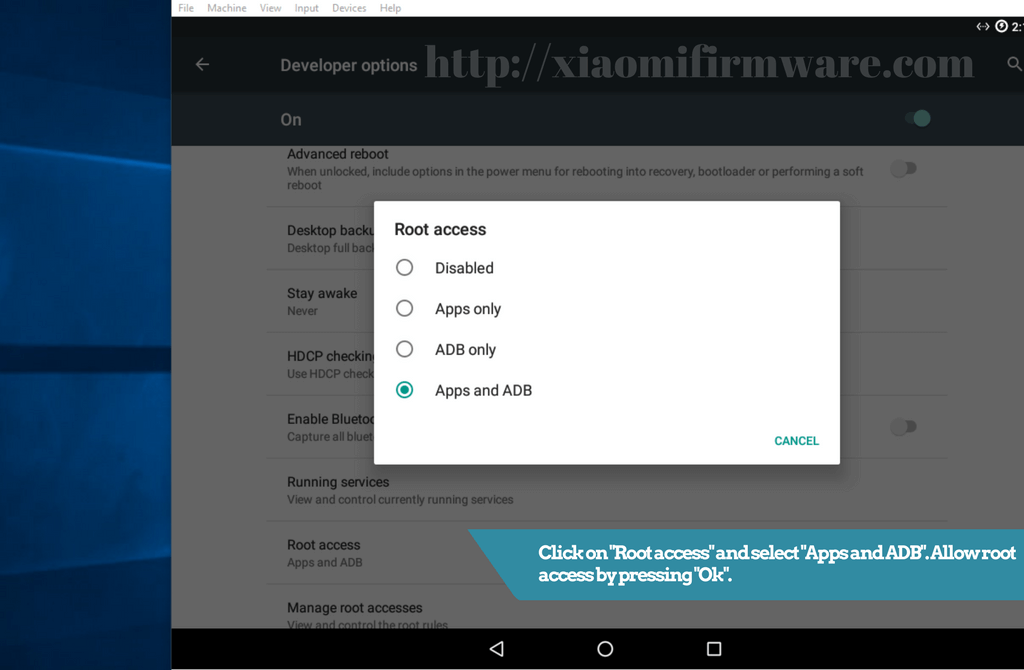
Enable root on Android-x86 CM 13 virtual machine. - Now you’ve got root on Android-x86 VirtualBox emulator.
Download links
Here you can download latest Android-x86 CM 13 release and the latest VirtualBox version.
- Android-x86 CM Release 13.0 ISO file: cm-x86_64-13.0-rc1.iso
- Official Website CM 13.0 Android-x86: http://www.android-x86.org/releases/releasenote-cm-x86-13-0-rc1
- VirtualBox 5.1.12 Official website: https://www.virtualbox.org/