
The expected release of Android Pie continues to elicit a lot of excitement. That’s because it would be the most advanced OS from Google to date. And like most people, we were too eager to wait for an OTA update. So, in a previous post, we tried out an unofficial port of Android 9 Pie GSI on Xiaomi Mi A1.
Some things in that port worked fine, while others didn’t. Stuff like VoLTE, Wi-Fi, and Bluetooth–for example–are working okay. But, excessive battery drain remains a problem. And the way OK Google functions is choppy at best.
Still, the Android 9 Pie GSI installation offered improvements that impressed us.
New Android 9 Pie Features
You’d have to install the Android 9 port first to understand why we love it so much. All the same, here are the enhancements that we couldn’t get enough of.
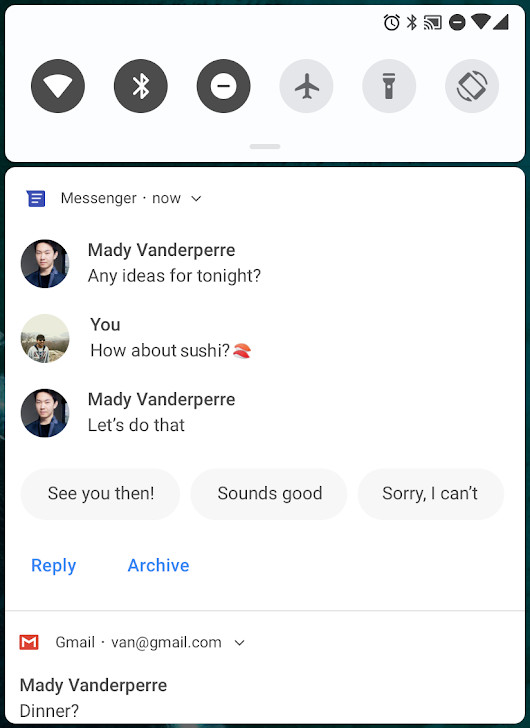
Enhanced Messaging
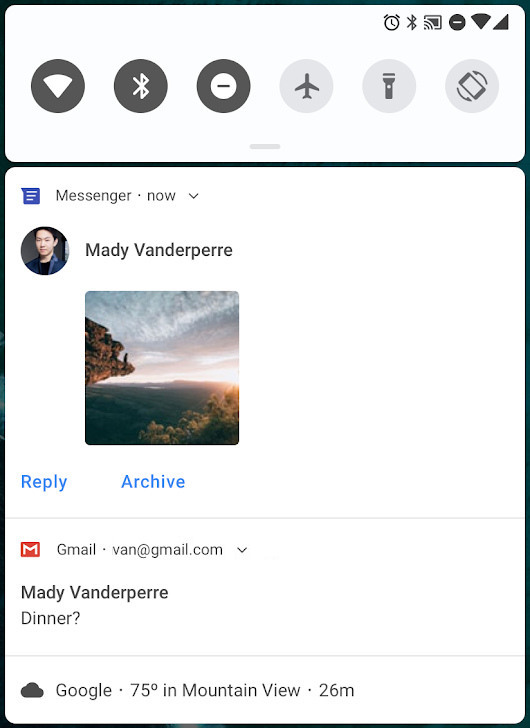
The messaging experience is way better on the Android Pie than on previous releases. The most notable feature is the use of avatars. Messages now include both the name and picture of the sender. And notifications can even display thumbnails of attached images from the message body.
If you’re a coder, these are the methods that now help you exploit the new messaging features listed above.
Create a sender with an avatar:
Person sender = new Person()
.setName(name)
.setUri(uri)
.setIcon(null)
.build();
Create a message notification that includes an image:
Message message = new Message("Picture", time, sender)
.setData("image/", imageUri);
Lockable Rotation Modes
I know you’ll love this one: you can now set the rotation to not change. Say you’re viewing something on your display and you’ve rotated it to landscape mode. In previous OSes, that would change back to portrait mode when you turned the display again. And that was quite irksome if the change in orientation was unintentional.
But thanks to Android Pie, we now have a button that pins the orientation to the mode you’re using at any given moment.

Enhanced Battery Usage
The Mi A1 used to disappoint us with the way it squandered its battery charge. Thus, it forced us to look for ways to deal with its wakelocks, for example, in an attempt to remedy the problem.
The good thing with the Android 9 Pie GSI port is that it handles battery usage out of the box.
Its Adaptive Battery feature extends battery life by limiting errant, background apps. Using app standby buckets, it allows the active apps to work without interruption. But the idle ones face restrictions, which reduces their battery usage.
Brightness that Adapts to Ambient Lighting
It seems the Android Pie release seeks to solve all the problems the Mi A1 suffers from. And the lack of proper brightness control was one of the most bothersome among these. See, it cascaded into issues like image retention and screen burn-in. But with the Adaptive Brightness feature on Android 9, these may well be a thing of the past.
The enhancement works so well because it learns your brightness preferences. It learns how you set levels and combines that with sensors’ data to try to match the ambient lighting. This means that a user may spend less time tinkering with the display. And this could save the display from premature deterioration.
Installation Recap
Remember, if you followed the previous post on how to install Android 9 Pie GSI on Mi A1, these are the files you flashed:
| File Type | File Name and Link |
|---|---|
| Vendor/drivers files |
|
| System/Android OS files |
|
| Boot/kernel files |
Using these, the hardware below works as it should. (But, some bugs do creep in too.)
What Works
- 3.5mm audio jack
- Bluetooth
- SIM, mobile data, and voice calls (both incoming and outgoing)
- VoLTE
- Wi-Fi
- Fingerprint Reader
Still, the ones below do work but users have noted that they are not perfect:
- Camera: If you have installed the Xiaomi Mi A2, it may crash often
- Microphone: Mic recording seems to fail sometimes. Thus, it affects apps like OK Google.
Reported Bugs
With that said, you would have noted that the Android 9 Pie GSI installation has a few bugs. These may include:
- SELinux remains permissive
- Double tap to wake doesn’t work as expected
- Fingerprint and capacitive navigation keys may have very weak haptic feedback
- The Mi A2 camera (we prefer this over the one for Mi A1) crashes often
So, in a second we’ll see how you can fix most of these issues.
How to Fix an Installation of Android 9 Pie GSI on Xiaomi Mi A1
- Before you continue, you’ll need ADB that is compatible with your new installation.
- So, flash this boot image ADB patcher using TWRP recovery: bootimage_adb_unsecure.zip. (Credits: XDA recognized developer, AdrianDC.)
- Make sure you have ADB drivers installed on your computer too.
- Remember to use the TWRP by, XDA senior member, CosmicDan.
- TWRP installer: TWRP-Installer-3.2.1-with-Tissot-Manager-2.4.zip
- You’ll also need to have root access on your Mi A1.
- For this, flash XDA recognized developer topjohnwu‘s Magisk v16.7: Magisk-v16.7.zip
With that out of the way, you can now start addressing the issues below.
Google Backup Stuck on “Waiting to Sync”
- Enable
USB debuggingon your Mi A1 - Connect the device to a computer using a USB cable
- Force device to sync to Google using these commands:
adb shell
bmgr run
bmgr backupnow --all
- Reboot
MTP not Working
- Turn on
Developer settings(tapBuild Numberfour times) - Go to
Default USB configuration - Press
File transfer
Want to use Substratum Themes
- Install Substratum theme engine:
- Substratum by R3Ds: Substratum_998-Pie.apk
- Find a theme that supports Android 9 Pie. Examples include:
- Choose the overlays that suit your purposes
- From the floating action bar, select
Build & Enable


Experiencing Excessive Battery Drain
Android Pie promises better battery performance than previous OSes. So, if you still find that your battery discharges fast, you will have to disable USB debugging.
Mi A2 Camera Crashes: Use GCam Instead
- Install the Pixel 2 camera mod by XDA senior member Arnova8G2. Find the link below.
- Pixel2Mod: GoogleCamera-Pixel2Mod-Arnova8G2-V8.2.apk
- But, if you want support for dual camera, install the camera mod by XDA senior member cstark27 instead. Find the link below.
- Cstark27 GCam v5.1: cstark27_GCam_5.1.018_24_tele_v0.1a.apk
- You could also try out other GCam mods.
- Find them here: Google Camera Port page
Don’t forget to share whether there is a mod that works better than the ones I’ve listed above. Head on to the comments section for that.
GCam Settings Force Closes
- Use TWRP recovery to flash this Magisk mod:
- GCam Magisk Fix by joeyhuab: Pie_GCamFix_Magisk_Tissot.zip
- Reboot
Need an Alternative to Google Photos
- Install a gallery app from LineageOS. Find the link below.
- LineageOS gallery app: gallery_port_los.apk
Need a Boot Logo Alternative
- Using TWRP recovery, flash this file by joeyhuab:
- Pixel 2 boot logo: Pixel2Bootlogo_tissot.zip
- Reboot
Need Nav Bar Gestures
- Flash this Magisk mod by joeyhaub using TWRP:
- Enable nav bar: Pie_NavBarEnabler_Magisk_Tissot.zip
- Reboot
- Go to
Settings,System, thenGestures - Select
Swipe Up on Home Button
Note: Your Mi A1’s capacitive keys will no longer work after this process.
Want to Tweak the Launcher
- If you want to use custom icon packs, change labels, and more then install the app below.
- Pixel Launcher Mods by XDA recognized developer Quinny899: pixel_launcher_mods_v1.2.apk
- You can also download the app from its official page. But, you’ll need XDA membership for that.
OK Google Does not Work as it Should
- Using TWRP recovery, flash the latest modem file by joeyhaub. Find the link below.
- 8.1 July 1 Modem: Tissot_8.1_July_1_Modem.zip
- Reboot
With these tweaks, your Android Pie installation should work smoothly.
But, what if you want to go back to stock ROM? And you want to “un-trebelize” your Mi A1?
The steps below will show you how to remove this Android 9 Pie GSI port from your phone.
How to go back to Stock ROM from Android 9 Pie GSI
Note: The process below will wipe your device clean, so remember to make a backup of your files.
Prerequisites:
- Download the latest, stable ROM. Find the link below.
- Stock ROM/firmware: tissot_images_V9.6.4.0.ODHMIFE_20180712.0000.00_8.0_735823083f.tgz
- Save the file to a computer and decompress it. Rename the extracted file by adding a .zip suffix.
- Decompress the renamed file. You should end up with a folder named:
tissot_images_V9.6.4.0.ODHMIFE_8.0
- Download the MiFlash tool and install it. Find the link below.
- MiFlash v7.4.25: MiFlashSetup_eng.msi
Steps:
- Boot into TWRP recovery. For that, you should restart the phone by holding down the power and volume up buttons.
- On the main TWRP screen press
AdvancedthenTissot Manager - TWRP will display a Disclaimer notice. Click
Nextafter reading it. - On the Tissot Manager screen, press
Repartition - The manager will present you with a Repartition for Treble notice. Select the option
I wish to repartition this deviceafter reading it. Then, pressRepartition - The repartitioning may take a minute. Wait for it to finish then press
Reboot TWRP.- Note: The repartitioning removes Treble support from your Mi A1–it “un-trebelizes” the phone.
- Once TWRP restarts, press
Rebooton the main screen. - Then press
Bootloaderon the Reboot screen - The device will switch to fastboot mode. Now, connect your Mi A1 to a computer.
- Run MiFlash v7.4.25 as an administrator on the computer
- Select the stock ROM by browsing to where you saved the firmware folder
- Press
refreshon the MiFlash tool. (Your Mi A1 should now show up on the flash tool.) - Select
cleanat the bottom of the flash tool’s screen if you want to remain with an unlocked bootloader. Otherwise, choose:clean all. - Press
flashat the top of the flash tool’s screen to start the installation of the stock ROM - Wait for the flashing process to finish. Your phone will then reboot into stock ROM
Final Thoughts
Android Pie is Google’s most advanced mobile OS. And we got a chance to try out an Android 9 Pie GSI port on Xiaomi Mi A1. But, the installation had a few issues. So, in this post, I suggested a few tweaks. Using these, Android Pie should be usable smoothly.
Still, for those who would want to go back to stock ROM, I added a guide on how to do so. The process removes Treble support on the Mi A1 completely.
Well, I know this might have been a bit of lengthy post. But, I hope that you got some useful tips from it.
If you have any suggestions or need further help, don’t hesitate to share in the comments section.